


Photoshop Tutorials: Create an Underwater Scene of a Giant Goldfish in Photoshop | |

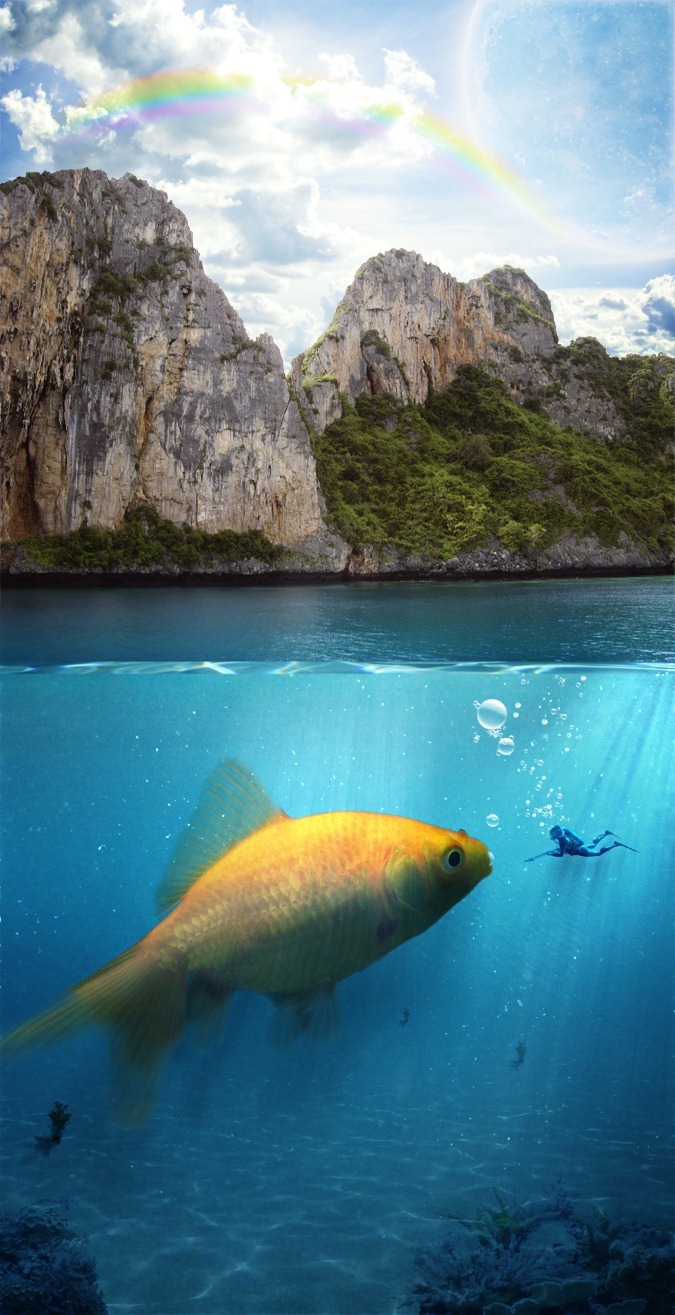
| Create an Underwater Scene of a Giant Goldfish in Photoshop Posted: 14 Jan 2013 11:46 AM PST Preview of Final Results
Download the PSDBig Fish.zip | 99.21 MB Giant Fish Photoshop TutorialTutorial ResourcesStep 1Create a new document 2150x4187px.
Step 2Open file "Sky" and select all (Ctrl + A). Copy all (Ctrl + C) and paste into our document (Ctrl + V). Press Ctrl + T to Free Transform and position the document like shown below.
Step 3Open file "Sky" and using the Elliptical Marquee Tool make a selection of the moon.
Step 4Copy and paste it into our document. Press Ctrl + T to Free Transform the moon like in the image below. Change the layer blend mode to Overlay.
Step 5Double-click the moon layer to enter Advanced Blending options and add the following styles to make the moon look more realistic.
Step 6Duplicate the moon layer by pressing Ctrl + J and Ctrl-click on the layer to make a selection of the moon. Fill this selection with black (with black as foreground color press Alt + Backspace) and apply a 250px Gaussian Blur. Change the layer blend mode to Multiply and lower the Opacity to 23%.
Step 7Add a Curves Adjustment layer and change the Blue and Red channel as shown below. This step will add a nice blue hue to the image.
Step 8In this step we will create the rainbow. Create a new layer and using the Rectangular Marquee Tool create a selection like shown below.
Step 9Select the Gradient Tool (G) and in the upper toolbar double-click to open the gradient editor.
Step 10To replicate a rainbow colors add the following colors in the gradient editor: red, orange, yellow, green, blue, indigo, magenta. When you are finished press OK.
Step 11Hold Shift and drag with the Gradient Tool in the selection you created at step 8. Press Ctrl + D to deselect and proceed to next step.
Step 12Use the Eraser tool to erase the margins of the gradient and apply a 20px Gaussian Blur.
Step 13With the rainbow layer selected press Ctrl + T to enter Free Transform. Right-click on the rainbow and choose Warp. From the upper drop down menu select Arch.
Step 14You can see the results of our transformation below. Now it starts to look like a real rainbow.
Step 15Change the rainbow layer blending mode to Color and lower the Opacity to 37%. Place the rainbow closer to the moon like shown below. Step 16Open file "Underwater" and select all (Ctrl + A). Copy then paste into our document. Use Free transform to resize and position the layer like shown below.
Step 17Paste the "Underwater" file again by pressing Ctrl + V and resize it like shown below.
|


| You are subscribed to email updates from Photoshop Tutorials To stop receiving these emails, you may unsubscribe now. | Email delivery powered by Google |
| Google Inc., 20 West Kinzie, Chicago IL USA 60610 | |


0 comments:
Post a Comment