


Photoshop Tutorials: How to Create This Mystical Scene and Add Makeup to a Girl in Photoshop | |

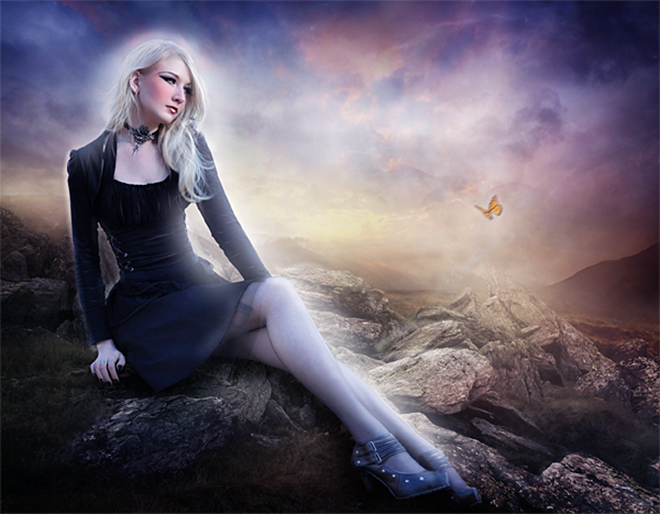
| How to Create This Mystical Scene and Add Makeup to a Girl in Photoshop Posted: 13 Mar 2013 01:19 PM PDT Preview of Final Results
Tutorial Resources
Step 1 – Open a New FileGo to File – New (Ctrl+N).
Then change the resolution of the new file to Width 2500 pixels and Height 1944 pixels.
Step 2 – Select the ModelOpen the model’s file and used the pen tool to select the model. Pass all over the edges and make sure you end the selection in the same point you started, closing the path like this:
Step 3 – Making the selectionAfter you close the path press right click and you will see a menu on the screen then choose the option Make Selection.
Then choose the option New Selection and press ok
The end result has to be like this one:
Step 4 – Duplicate the SelectionNow Press Ctrl + J on your keyboard or press right click and select the option Layer via Copy.
Step 5- Add a baseAdd base image for the background, In this case you can use a blue tone, with not to much saturation and reduce the opacity to 90%.
Step 6 – StonesAdd the layer with the stones to the background. Resize the layer pressing Ctrl + T in the option free transform to fit the image. Press enter to apply the transformation. Make sure you press Shift and with the mouse on one of the corners change the size of the image in that way the Width and the Height are always going to be the same, and the image will never be distort.
Step 7 – Reduce Saturation.Go to menu: Image – Adjustments – Hue/Saturation (Ctrl+U) and in the option Saturation reduce to -40. Press ok to save the changes.
Step 8- EraseNow pick the Eraser tool (E) and pass over the sky, just leave the rocks. Choose a soft round brush of 600px.
Step 9 – Change Layer ModeChange the rocks layer mode to hard light.
Step 10 – MountainsAdd a new layer, this one has mountains and nice colors. Add that to the image. You can always modify the size with free transform (Ctrl+T)
Step 11- EraseReduce the opacity of the layer to 80% and pick the eraser tool (E) and pass over the rocks.
Step 12 – CloudsAdd a sky to the image to create the effect of more clouds in the sky.
Step 13- Soft LightNow change the layer mode to soft light
Step 14- More mountains.Add more mountains to the image. Erase the undesired parts with the eraser tool.
Step 15 – Soft LightChoose the option soft light for the layer of the mountains and reduce the opacity to -70%
Step 16 – TextureAdd a fractal texture to the image to increase the colors of the scene.
Step 17 – More soft lightChoose soft light mode to the layer and reduce opacity to 50%.
Step 18 – SofterIf you think the colors are to strong go to the layer of the mountains the one of the step 10 and use that layer in soft light mode with 90% of opacity. And you will get this result:
Step 19 – Shadows and LightAdd some shadows and light behind the model. To do that create two different layers paint one with a soft round brush color black, and the other with white.
Step 20 – Layers mode.The layer you paint with the white brush use it in soft light with 60% of opacity
And the layer you paint with black just reduce the opacity to 85%
Step 21 – LegsMake the model’s legs less darker, to do that select the legs with the lasso tool (L). and the press Ctrl+J to duplicate the selection.
Step 22 – Layer modeChange layer’s mode to Screen and reduce the opacity to 60%.
Step 23 – Select the SkinNow select the model’s skin using the lasso tool once again, duplicate the selection pressing Ctrl+J.
Step 24 – Less SaturationGo to the menu Image – Adjustments – Hue/ Saturation (Ctrl+U) and in the option saturation use: -30
Step 25 – The eyesPaint over the eyes with a soft round brush 2px in a blue tone. Also paint details with black and white.
Step 26 – LipsGo to model’s original layer select the lips with the lasso tool and change the color to soft pink (Ctrl+U).
Change the layer mode to Multiply and reduce the opacity to 50%
Step 27 – BrighterTo give to the lips a glossy look duplicate the layer you used before and use it in soft light mode.
Step 28 – BlushAdd a new layer, choose multiply mode, then paint over the model’s cheeks with a round soft brush in a pink tone. Remember to reduce the opacity of the brush to 70%.
Step 29 – Reduce OpacityReduce layer opacity to 50%
Step 30 – EyebrowsPaint over the model’s eyebrows with a soft round brush in a brown tone, and then pass the blur tool to make it softer.
Step 31 – Eye shadowsPaint with a soft round brush in a purple tone the eye shadow.
Step 32 – Change modeUse layer in multiply mode and change the opacity to 70%
Step 33 – HairChoose hair brushes, to add more strand and make the hair more natural. Also you can pass the blur tool over the strands to get them softer.
Repeat the process several times until you get the desired result.
Step 34 – Freeform Pen toolAdd a new layer (Shift + Ctrl +N) and pick the Freeform pen tool. Make some strokes over the model’s face and cloth.
Step 35 – BrushMake sure your brush is set with a white soft brush of 2px or 3px cause you are going to use that for the strokes made with the freeform pen tool.
Step 36 – StrokesNow pick once again the freeform pen tool and press right click, choose the option stroke path on the menu.
Then choose the option Simulate pressure brush and press ok.
Step 37 – Fixing Strokes.You are going to have the strokes like this:
To fix then pick the blur and the smudge tool to make them softer and to move the shapes to get a better result like this one:
Step 38- Less opacityReduce the opacity of the layer to 60%
Step 39 – Light and shadowLike you did before on the step 19 add two layers one from the lights and the other one for the shadows and paint both with soft round brushes, the lights with white and the shadows with black. Shadows: Layer Normal mode 50% opacity.
Light 1: Layer Normal mode 50% of opacity.
Light 2: With a small brush paint over the details, use layer in soft light mode.
Step 40 – Butterfly.Add a butterfly to the image and apply the filter motion blur. Go to Filter – Blur – Motion Blur.
Press Motion Blur and use 28 in angle and in distance use 13px.
Step 41 – ColorAdd a texture layer and use Gaussian blur to make it softer. Filter – Blur – Gaussian Blur.
Use 100px of radius.
Step 42- Layer ModeUse soft light mode in that layer.
Step 43 – LightingAdd a new layer with a stock like this one:
Now apply Gaussian Blur. Filter- Blur – Gaussian Blur. And add 150px radius.
Step 44 – SaturationReduce the saturation of the layer press Ctrl+U or go to Image- Adjustments – Hue/Saturation. and in the option saturation put -100.
Step 45 – Layer ModeChange layer mode to soft light and reduce the opacity to 70%
Final ResultsThat’s it, hope you have great results using this tutorial.
Tutorial by Andrea Garcia
- Andrea García |


 Thank you so much for reading this tutorial I hope this is helpful for you all I you want to check more of my art go to www.andygarcia666.deviantart.com
| You are subscribed to email updates from Photoshop Tutorials To stop receiving these emails, you may unsubscribe now. | Email delivery powered by Google |
| Google Inc., 20 West Kinzie, Chicago IL USA 60610 | |


0 comments:
Post a Comment