Pages

Pages

Monday, December 31, 2012

Photoshop Tutorials: Photoshop Video Tutorial: How to Install and Use Photoshop Brushes

Photoshop Tutorials: Photoshop Video Tutorial: How to Install and Use Photoshop Brushes

Link to Photoshop Tutorials

Photoshop Video Tutorial: How to Install and Use Photoshop Brushes

Posted: 30 Dec 2012 04:46 PM PST


Where to to download Photoshop brushes:


Photoshop preferences folder:

  • Mac OS X Lion: Hold down the Alt (Option) key when using the Go menu. The user library folder is listed below the current users home directory.
  • Mac OS: Users/[user name]/Library/Preferences/Adobe Photoshop CS6 Settings
  • Windows Vista, 7, and 8: Users/[user name]/AppData/Roaming/Adobe/Adobe Photoshop CS6/Adobe Photoshop CS6 Settings
  • Windows XP: Documents and Settings/[user name]/Application Data/Adobe/Adobe Photoshop CS6/Adobe Photoshop CS6 Settings

Like this video? See more great Photoshop tutorials by subscribing to our YouTube channel!

Sunday, December 30, 2012

Photoshop Tutorials: The Best Photoshop Tutorials of 2012

Photoshop Tutorials: The Best Photoshop Tutorials of 2012

Link to Photoshop Tutorials

The Best Photoshop Tutorials of 2012

Posted: 29 Dec 2012 02:54 PM PST

How to Create a Fantasy Haven for Travelers in Photoshop


How to Create a Dramatic Fisheye Spartan Scene with Photoshop


Create an Amazing Surreal-Style Treehouse in Photoshop


How to Create a Psychedelic Tiger Illustration in Photoshop


Let Me Sink – Emotional Rainy Scene Photo Manipulation


Create this Amazing Fashion Photo Manipulation with Abstract Smoke and Light Effects


How to Create This Freezing Cold Portrait Photo Manipulation in Photoshop


Create a Mixed Media Style Design In Photoshop


How to Create this "Into the Wild" Photo Manipulation in Photoshop


How to Create an Emotional Soft-Tone Photo Manipulation


Create a Emotional Midnight Photo Manipulation with Painting-Like Effects


How to Create a Surreal Scene with an Invisible Man Inside a Mystic Cave


How to Create a Stunning Winter Princess Artwork in Photoshop


How to Create an Epic Portal Scene in Photoshop


How to Create Shiny Retro Text with Photoshop


How to Create a Chilling Portrait Manipulation for Halloween


How to Create a Surreal Scene Full of Life in Photoshop


"The Controller" – Create this Floating Superhero Scene with Sci-Fi Lighting Effects in Photoshop


How to Create a Breathtaking Christmas Artwork in Photoshop


Create This Incredible Surreal Photo Manipulation of a Dancer in Photoshop

Friday, December 28, 2012

Site Updates

Site Updates


Best web design tools you should be using for 2013

Posted: 27 Dec 2012 11:45 PM PST

Design
Some of the best web development tools introduced in 2012 that you should be using for 2013

Monday, December 24, 2012

Photoshop Tutorials: How to Create a Breathtaking Christmas Artwork in Photoshop

Photoshop Tutorials: How to Create a Breathtaking Christmas Artwork in Photoshop

Link to Photoshop Tutorials

How to Create a Breathtaking Christmas Artwork in Photoshop

Posted: 24 Dec 2012 12:00 AM PST

Preview of Final Results

Download the PSD

Giant Christmas Tree.zip | 173.96 MB


How to Create a Giant-sized Christmas tree in a Winter Field


Tutorial Resources


Step 1

Now, let’s start by creating a new image file, go to the Menu bar and click File > New, and then input the following values on their respective fields:

  • Preset: Custom
  • Width: 3000 pixels
  • Height: 3000 pixels
  • Resolution: 300 pixels/inch
  • Color Mode: RGB Color; 8 bit
  • Background Contents: Transparent

step1a


Step 2

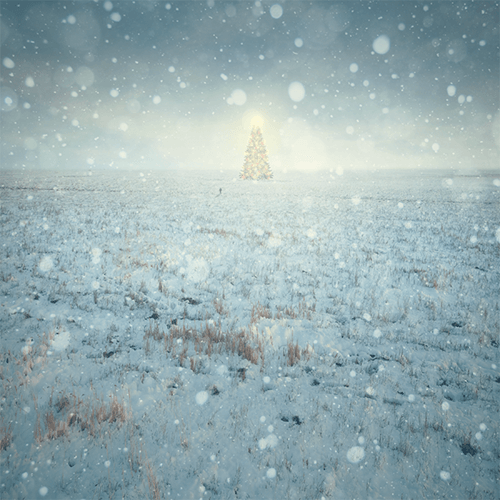
Now, we will be creating the sky of our Christmas image. To start, open “dry winter field” by night fate stock. Next activate the Rectangular Marquee Tool by pressing M on your keyboard.

image005

Once activated, create a selection area around the sky as shown below:

step2a


Step 3

After that, activate the Move tool (V) and drag the image by first left-clicking on it and dragging it to our canvas. Once on the canvas, position it as shown below:

step2b


Step 4

Rename the layer to “sky 1″. To rename a layer, simply double-click on the words: “layer 1″ (you can find that on the layer window) to prompt a text box to appear.

step2c


Step 5

Now, activate the Transform tool (Ctrl/Cmd + T) and resize the image as shown below:

step2d

step2e


Step 6

Next, let’s add the second sky. Open “storming sky” by vimark and once open, activate the Rectangular Marquee Tool (M) and create a selection area around the sky of this image. See image below:

step2f


Step 7

Now, activate the Move tool (V) and drag this image to our canvas and put this layer above the “sky 1″ layer. To do that, simply drag this new layer on top of the “sky 1″ layer. Rename this layer to “sky 2″. Position it on the canvas as shown below:

step2g

Now, activate the Transform tool (Ctrl/Cmd + T) and resize this layer as shown below:

step2h

The result:

step2i


Step 8

Now, let’s blend these two skies together. To do that, simply change the Blending mode of “sky 2″.

step2j

Change the Blending mode of “sky 2″ to Soft Light and the Opacity, should still be at 100%.

step2k

The result:

step2L


Step 9

Next, we will darken the sky so it wouldn’t look flat. Start by left-clicking on the “sky 2″ layer and then press Ctrl/Cmd + Shift + N on your keyboard to create a new layer directly above the selected layer; once the box opens, input “darken 1″ on the name field.

step2m


Step 10

Now, we will be creating the snow covered field. To start, let’s open “Winter Field” by night fate stock. Once open, activate the Move tool (V) and drag it to our canvas. Make sure to put it above the “darken 1″ layer. Position it as shown below:

step2n

Rename this layer to “ground”. Activate the Transform tool (Ctrl/Cmd + T) and resize it as shown on the images below:

step2o

step2p

step2q

The result:

step2r